RIP, which stands for Routing Information Protocol, is a distance-vector routing protocol used in computer networking and particularly in Cisco networking equipment. RIP is one of the oldest and simplest routing protocols used to exchange routing information between routers in a network. Cisco routers can be configured to use RIP for routing purposes.
Here are some key characteristics of RIP in the context of Cisco networking:
- Version: There are two versions of RIP: RIP version 1 (RIPv1) and RIP version 2 (RIPv2). RIPv1 is an older and less feature-rich version, while RIPv2 includes improvements such as support for classless routing and authentication. Cisco routers can support both versions.
- Distance-Vector: RIP is a distance-vector routing protocol, which means that routers exchange routing information with their neighbors at regular intervals. Each router maintains a routing table that contains information about the best path to reach various network destinations based on metrics like hop count.
- Metric: RIP uses hop count as its metric for path selection. Each router counts the number of hops (router-to-router connections) to reach a destination network. Paths with fewer hops are considered better.
- Convergence: RIP routers exchange routing updates every 30 seconds by default. This frequent exchange of updates helps the network converge relatively quickly in response to topology changes. However, this frequent update process can also create network traffic.
- Split Horizon: To prevent routing loops, RIP uses a technique called “split horizon.” In split horizon, a router does not advertise routes back out the interface from which it received those routes. This helps prevent loops in the network.
- Route Poisoning and Holddown Timers: When a route becomes unavailable, RIP routers use a technique called “route poisoning” to inform other routers about the change. There’s also a holddown timer to prevent routers from accepting potentially outdated routing information too quickly after a route has failed.
- Maximum Hop Count: RIP has a maximum hop count limit of 15 hops. If a route exceeds this limit, it is considered unreachable.
While RIP is simple to configure and deploy, it has limitations, such as its hop-count metric and slower convergence times compared to more modern routing protocols like OSPF or EIGRP. As a result, RIP is often used in small to medium-sized networks or in legacy environments where more advanced routing protocols are not required.
Cisco routers support RIP configuration, allowing network administrators to enable RIP routing, set routing preferences, and fine-tune routing behavior based on their network requirements.
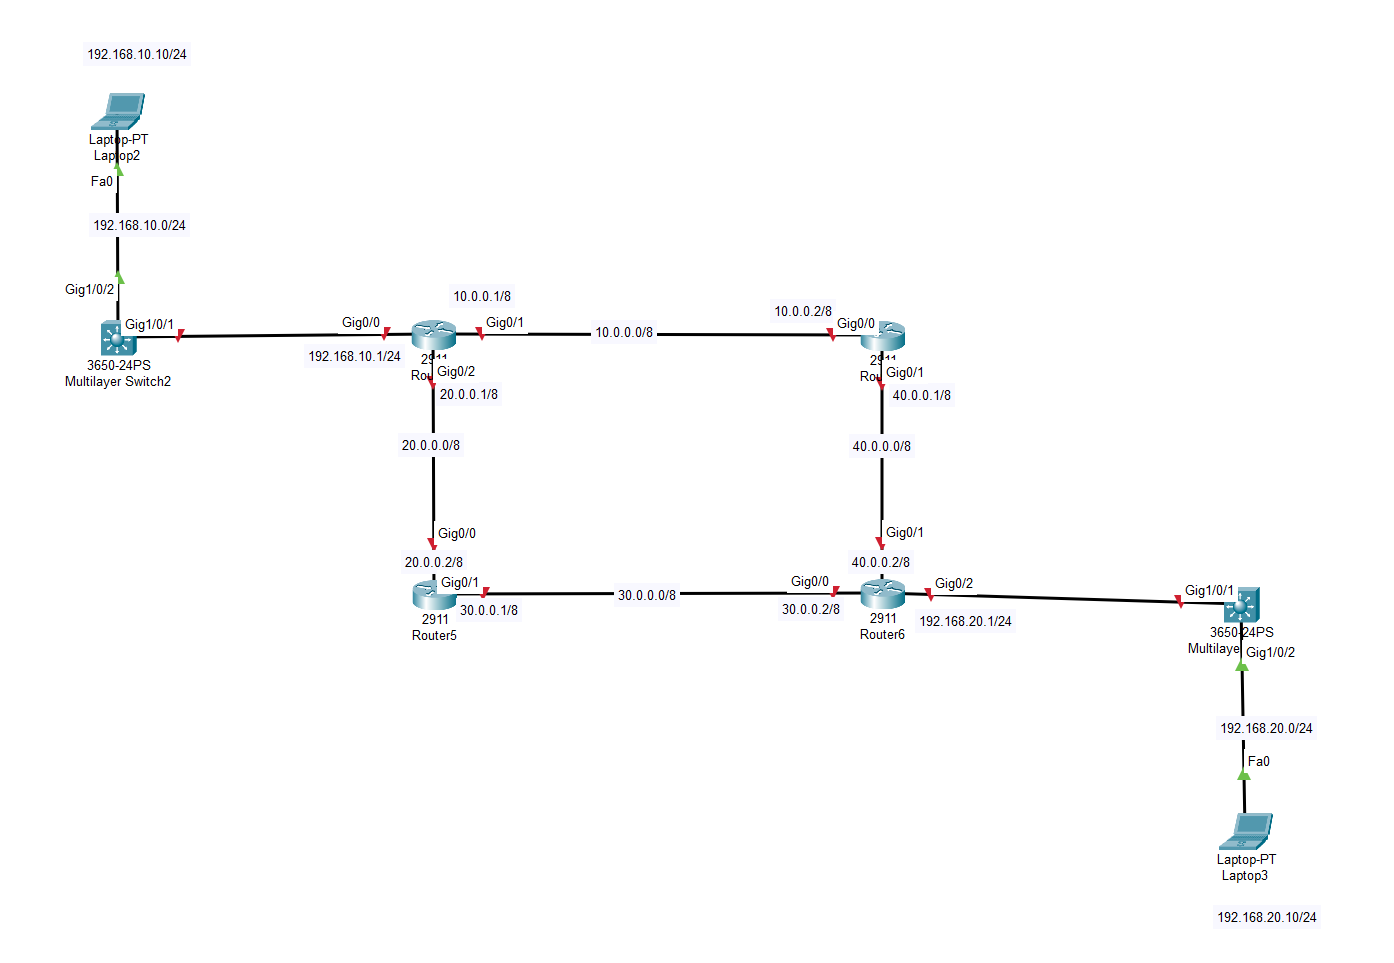
Below you can find the low level diagram of router connections.
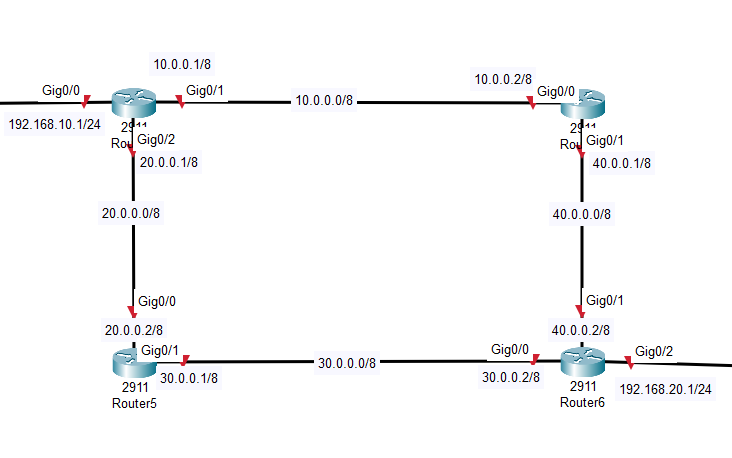
On this topology, we have 4 routers, 2 switches, 2 clients. We will implement RIP protocol on 4 routers and will configure the clients with our given IP subnets. At the end we will check RIP database on the router to verify if it is working properly.
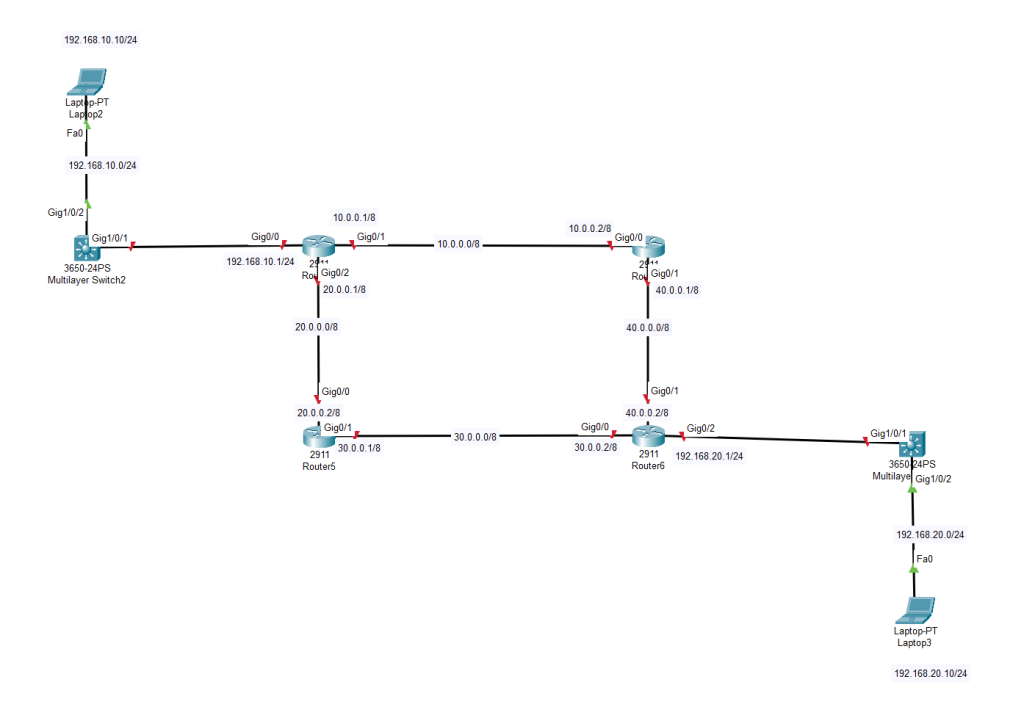
Let’s start with router 1.
ROUTER 1 – CONFIGURATION
Router>enable
Router#configure terminal
Enter configuration commands, one per line.  End with CNTL/Z.
Router(config)#hostname ROUTER1
ROUTER1(config)#int g0/0
ROUTER1(config-if)#ip address 192.168.10.1 255.255.255.0
ROUTER1(config-if)#no shutdown

ROUTER1(config-if)#
%LINK-5-CHANGED: Interface GigabitEthernet0/0, changed state to up

%LINEPROTO-5-UPDOWN: Line protocol on Interface GigabitEthernet0/0, changed state to up

ROUTER1(config-if)#exit
ROUTER1(config)#int g0/1
ROUTER1(config-if)#ip address 10.0.0.1 255.0.0.0
ROUTER1(config-if)#no shutdown

ROUTER1(config-if)#
%LINK-5-CHANGED: Interface GigabitEthernet0/1, changed state to up

ROUTER1(config-if)#exit
ROUTER1(config)#int g0/2
ROUTER1(config-if)#ip address 20.0.0.1 255.0.0.0
ROUTER1(config-if)#no shutdown

ROUTER1(config-if)#
%LINK-5-CHANGED: Interface GigabitEthernet0/2, changed state to up

ROUTER1(config-if)#exit
ROUTER1(config)#router rip
ROUTER1(config-router)#network 192.168.10.0
ROUTER1(config-router)#network 10.0.0.0
ROUTER1(config-router)#network 20.0.0.0
ROUTER1(config-router)#exit
ROUTER1(config)#do wr
Building configuration...
[OK]
ROUTER1(config)#
ROUTER 2 – CONFIGURATION
Router>enable
Router#configure terminal
Enter configuration commands, one per line. End with CNTL/Z.
Router(config)#hostname ROUTER2
ROUTER2(config)#int g0/0
ROUTER2(config-if)#ip address 20.0.0.2 255.0.0.0
ROUTER2(config-if)#no shutdown
ROUTER2(config-if)#
%LINK-5-CHANGED: Interface GigabitEthernet0/0, changed state to up
%LINEPROTO-5-UPDOWN: Line protocol on Interface GigabitEthernet0/0, changed state to up
ROUTER2(config-if)#exit
ROUTER2(config)#int g0/1
ROUTER2(config-if)#ip address 30.0.0.1 255.0.0.0
ROUTER2(config-if)#no shutdown
ROUTER2(config-if)#
%LINK-5-CHANGED: Interface GigabitEthernet0/1, changed state to up
ROUTER2(config-if)#exit
ROUTER2(config)#router rip
ROUTER2(config-router)#network 20.0.0.0
ROUTER2(config-router)#network 30.0.0.0
ROUTER2(config-router)#exit
ROUTER2(config)#do wr
Building configuration…
[OK]
ROUTER2(config)#
ROUTER 3 – CONFIGURATION
Router>enable
Router#configure terminal
Enter configuration commands, one per line.  End with CNTL/Z.
Router(config)#hostname ROUTER3
ROUTER3(config)#int g0/0
ROUTER3(config-if)#ip address 10.0.0.2 255.0.0.0
ROUTER3(config-if)#no shutdown

ROUTER3(config-if)#
%LINK-5-CHANGED: Interface GigabitEthernet0/0, changed state to up

%LINEPROTO-5-UPDOWN: Line protocol on Interface GigabitEthernet0/0, changed state to up

ROUTER3(config-if)#exit
ROUTER3(config)#int g0/1
ROUTER3(config-if)#ip address 40.0.0.1 255.0.0.0
ROUTER3(config-if)#no shutdown

ROUTER3(config-if)#
%LINK-5-CHANGED: Interface GigabitEthernet0/1, changed state to up

ROUTER3(config-if)#exit
ROUTER3(config)#router rip
ROUTER3(config-router)#network 10.0.0.0
ROUTER3(config-router)#network 40.0.0.0
ROUTER3(config-router)#exit
ROUTER3(config)#do wr
Building configuration...
[OK]
ROUTER3(config)#
ROUTER 4 – CONGIFURATION
Router>enable
Router#configure terminal
Enter configuration commands, one per line.  End with CNTL/Z.
Router(config)#hostname ROUTER4
ROUTER4(config)#int g0/0
ROUTER4(config-if)#ip address 30.0.0.2 255.0.0.0
ROUTER4(config-if)#no shutdown

ROUTER4(config-if)#
%LINK-5-CHANGED: Interface GigabitEthernet0/0, changed state to up

%LINEPROTO-5-UPDOWN: Line protocol on Interface GigabitEthernet0/0, changed state to up

ROUTER4(config-if)#exit
ROUTER4(config)#int g0/1
ROUTER4(config-if)#ip address 40.0.0.2 255.0.0.0
ROUTER4(config-if)#no shutdown

ROUTER4(config-if)#
%LINK-5-CHANGED: Interface GigabitEthernet0/1, changed state to up

%LINEPROTO-5-UPDOWN: Line protocol on Interface GigabitEthernet0/1, changed state to up

ROUTER4(config-if)#exit
ROUTER4(config)#int g0/2
ROUTER4(config-if)#ip address 192.168.20.1 255.255.255.0
ROUTER4(config-if)#no shutdown

ROUTER4(config-if)#
%LINK-5-CHANGED: Interface GigabitEthernet0/2, changed state to up

%LINEPROTO-5-UPDOWN: Line protocol on Interface GigabitEthernet0/2, changed state to up

ROUTER4(config-if)#exit
ROUTER4(config)#router rip
ROUTER4(config-router)#network 40.0.0.0
ROUTER4(config-router)#network 30.0.0.0
ROUTER4(config-router)#network 192.168.20.0
ROUTER4(config-router)#exit
ROUTER4(config)#do wr
Building configuration...
[OK]
RIP DATABASE VERIFICATION
ROUTER1#show ip rip database
10.0.0.0/8    auto-summary
10.0.0.0/8    directly connected, GigabitEthernet0/1
20.0.0.0/8    auto-summary
20.0.0.0/8    directly connected, GigabitEthernet0/2
30.0.0.0/8    auto-summary
30.0.0.0/8
    [1] via 20.0.0.2, 00:00:16, GigabitEthernet0/2
40.0.0.0/8    auto-summary
40.0.0.0/8
    [1] via 10.0.0.2, 00:00:05, GigabitEthernet0/1
192.168.10.0/24    auto-summary
192.168.10.0/24    directly connected, GigabitEthernet0/0
192.168.20.0/24    auto-summary
192.168.20.0/24
    [2] via 20.0.0.2, 00:00:16, GigabitEthernet0/2    [2] via 10.0.0.2, 00:00:05, GigabitEthernet0/1
ROUTER1#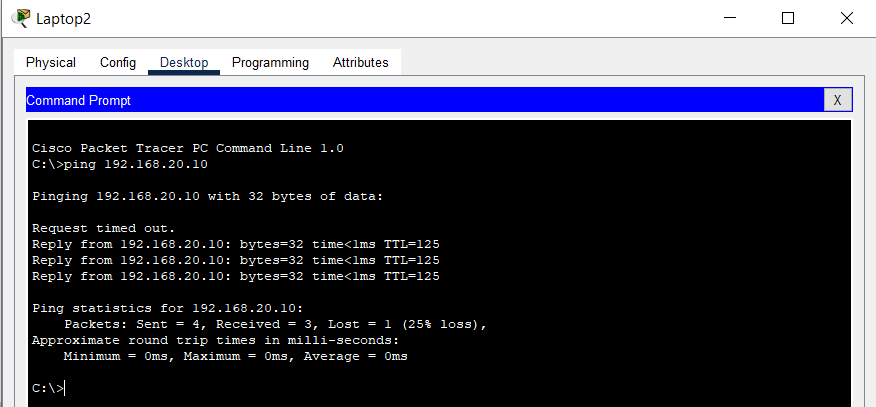
You can download the simulation file which I created below.
Do not hesitate to contact me if you have further questions.
Happy networking 🙂
